uHOWTO: Recover stuck modified keys from VMware Player or Workstation

January 15th, 2009

If you use VMware Player or VMware workstation under Linux and you’re an alt-tab fan like me, you might end up with stuck modifier keys, so you can’t use keys like Ctrl, Alt or Shift outside of VMware. Xiao Feng has written a nice script to recover from this annoying condition without having to reboot, and I tought I’d share it with everyone out there:

#!/bin/sh
# Xiao Feng’s "Recovering from stuck modifier keys caused by VMware"
# http://bitubique.com/tutorials/recovering-from-stuck-modifier-keys
/usr/bin/xmodmap<< fixme
clear shift
add shift = Shift_L Shift_R
clear lock
add lock = Caps_Lock
clear control
add control = Control_L Control_R
clear mod1
add mod1 = Alt_L Alt_R
clear mod2
add mod2 = Num_Lock
clear mod3
clear mod4
add mod4 = Super_L Super_R
clear mod5
add mod5 = Scroll_Lock
fixme

xset r on
xset m 3.5 4
xset b off
xset s off
  • link
  • link
  • link
  • link
  • link

Comments Off

uHOWTO: Speed up RAID resync

December 15th, 2008

So you’re tired of watching the grass grow while your Linux RAID2 array rebuilds itself. Let’s take care of it:

$ echo 10000 > /proc/sys/dev/raid/speed_limit_min

This should give you a 10x speedup over the 1000kB/sec default — subject to the limitations of your actual bus bandwidth, of course.

A brief note about Spamhaus Policy Block List

December 9th, 2008

After getting in closer-than-usual acquaintance with my mail server logs I thought I’d share a brief note I found in the Spamhaus PBL FAQ:

The first thing to know is: THE PBL IS NOT A BLACKLIST.

Oh, and since you’re already there you may want to linger a bit in this warning:

WARNING! Some post-delivery filters use “full Received line traversal” or “deep parsing”, where the filter reads all the IPs in the Received lines. Legitimate users, correctly sending good mail out through their ISP’s smarthost, will have PBL-listed IPs show up in the first (lowest) Received header where their ISP picks it up. Such mail should not be blocked! So, you should tell your filters to stop comparing IPs against PBL at the IP which hands off to your mail server! That last hand-off IP is the one which PBL is designed to check. If you cannot configure your filters that way, then do not use PBL to filter your mail. Instead, you may wish to use sbl-xbl.spamhaus.org, but even that may have unacceptable “false positive” filtering, for example when a an exploited end-user machine sends legitimate mail out through the ISP smarthost, or when the dynamic assignment changes the IP to an uninfected machine. Do not use PBL or XBL if you do not understand the issues of “deep parsing”.

(Emphasis mine)
So if your top-of-the-line multi-thousand-dollar antispam appliance starts blocking all my email just because there’s a dynamic IP address somewhere in the header and there’s no freaking way to turn it off please go ask for a refund. And stop bouncing my messages.
Oh and by the way the default SpamAssassin configuration in Debian assigns a 0.905 score if the last hop is in PBL.

score RCVD_IN_PBL 0 0.509 0 0.905

header RCVD_IN_PBL              eval:check_rbl(‘zen-lastexternal’, ‘zen.spamhaus.org.’, ’127.0.0.1[01]‘)

And yes, SpamAssassin does the right thing and checks only the *last* external address — I’ve seen the code:

package Mail::SpamAssassin::PerMsgStatus;

    # If name is foo-lastexternal, check only the Received header just before
    # it enters our internal networks; we can trust it and it’s the one that
    # passed mail between networks

So once again kudos to Open Source — and Common Sense.

  • link
  • link
  • link
  • link
  • link

Comments Off

uHOWTO: Use your N95 8G as a bluetooth modem under Linux with Telcel

September 30th, 2008


For completeness, here’s a followup to my post about using a Nokia N95 as a bluetooth modem under Linux. This is a working wvdial configuration for use with Telcel in Mexico.
Remember to enter your SIM’s PIN in pin-telcel, and refer to my previous post for complete instructions.

[Dialer pin-telcel]
Modem = /dev/rfcomm0
Baud = 460800
Init1 =AT+Cpin=XXXX

[Dialer telcel]
Phone = *99***1#
Username = telcel
Password = telcel
Stupid Mode = 1
Dial Command = ATDT
Check Def Route = on
Dial Attempts = 3
Modem = /dev/rfcomm0
Baud = 460800
Init2 = ATZ
Init3 = ATQ0 V1 E0 S0=0 &C1 &D2 +FCLASS=0
Init4 = AT+CGDCONT=1,”IP”,”internet.itelcel.com”
ISDN = 0
Modem Type = Analog Modem

To use it, enter

# wvdial vodafone-pin
# wvdial vodafone

Enjoy!

HOWTO: Use your Nokia N95 Cellphone as a Bluetooth modem for Linux

September 28th, 2008

Did you know that you can use your data-enabled N95 to get a thethered Internet connection from Linux? The access mode and speed will depend on your actual coberture, and as usual YMMV, but I’ve been using this setup for a few months and it works fine.

$ sudo -s
# apt-get install bluetooth bluez-pin bluez-utils kdebluetooth wvdial

Now in user mode use KBlueMon to find out the Bluetooth address of your device and write it down.
Then go ahead and initiate an OBEX file transfer to make sure that you can actually link to your phone and to establish a trust relationship. In your phone add the Laptop to your trusted device list, so it won’t nag you whenever you establish a link.
Now edit /etc/bluetooth/rfcomm.conf :

rfcomm0 {
bind yes;
device 00:21:09:XX:XX:XX;
channel 2;
}

Replace your own device address after “device”.
Now edit /etc/wvdial to add these two entries:

[Dialer pin-vodafone]
Modem = /dev/rfcomm0
Baud = 460800
Init1 =AT+Cpin=XXXX

[Dialer vodafone]
Phone = *99***1#
Username = vodafone
Password = vodafone
Stupid Mode = 1
Dial Command = ATDT
Check Def Route = on
Dial Attempts = 3
Modem = /dev/rfcomm0
Baud = 460800
Init2 = ATZ
Init3 = ATQ0 V1 E0 S0=0 &C1 &D2 +FCLASS=0
Init4 = AT+CGDCONT=1,”IP”,”ac.vodafone.es”
ISDN = 0
Modem Type = Analog Modem

You can give them any name you want. I have defined several providers, to avoid confusions and to use the provider at hand. Replace the “XXXX” in Init1 with your SIM’s PIN.
Now to use them restart the Bluetooth subsystem:

# /etc/init.d/bluetooth restart

And use wvdial to dial out:

# wvdial vodafone-pin
# wvdial vodafone

You should get an Internet link, complete with an IP, a default route and a couple of DNS servers. If it doesn’t, reboot your phone liberally.
Please note that this might get expensive quite quickly unless you get a data plan from your provider. Go ahead and make their day.
Enjoy!

Enable APM level on Dell Latitude D620 HD

October 30th, 2007

Rafael Garcia-Suarez shares a helpful tip to correctly enable APM in his D420 running Ubuntu, but I can confirm that my D620 behaves the same -ignoring APM level 255 and disabling APM completely instead- and that his fix runs equally well, just by adding

/dev/sda {
apm = 254
}

to /etc/hdparm.conf and making sure that /etc/init.d/hdparm runs at startup (the default after apt-get installing hdparm in my case).

Attansic L1 Gigabit Ethernet driver for Debian

July 20th, 2007

m2v.jpeg
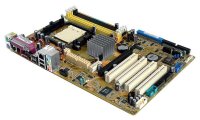
I just got a new ASUS M2V motherboard to replace a braindead server that would lock up on POST about 75% of the time. The new motherboard has a built-in Attansic L1 Gigabit Ethernet Adapter that is supported in Linux >= 2.6.21, but its driver is still missing from the daily Debian netinst CDs.

04:00.0 Ethernet controller [0200]: Attansic Technology Corp. L1 Gigabit Ethernet Adapter [1969:1048] (rev b0)
Subsystem: ASUSTeK Computer Inc. Unknown device [1043:8226]
Flags: bus master, fast devsel, latency 0, IRQ 25
Memory at fbcc0000 (64-bit, non-prefetchable) [size=256K]
Expansion ROM at fbca0000 [disabled] [size=128K]
Capabilities: [40] Power Management version 2
Capabilities: [48] Message Signalled Interrupts: Mask- 64bit+ Queue=0/0 Enable-
Capabilities: [58] Express Endpoint IRQ 0
Capabilities: [6c] Vital Product Data

I tried David Johnson’s pre-compiled driver for AMD64 but it didn’t work right away, so I compiled AtL1Linux_v1.0.41.0 for the stock 2.6.18-4-486 kernel in the official Debian 4.0 netinst CD and tested it. Although it was supposed to work right out of the box I kept getting “invalid module format” messages. So I stripped out the version information with

$ objcopy -R .modinfo atl1.ko

and it worked immediately. I completed the installation and I will upgrade the server to 2.6.21-2-amd64 over the weekend. So here is a atl1.ko for 2.6.18-4-486 that should work just fine.

By the way, I stripped the version information off David’s atl1.ko but I didn’t get a chance to test it because I was in a hurry. Here it is anyway in case someone finds it useful: atl1.ko for 2.6.18-4-amd64.
Oh, by the way, the M2V has four PCI slots but no built-in VGA adapter, and most PCI-e video cards are so thick that the first slot becomes unusable. Since I bought this motherboard precisely to maximize the number of available PCI slots in the server… well, it just sucks.

Use the radioSHARK 2 under Linux (shark2.c)

May 20th, 2007

radioshark2-small.jpegHisaaki Shibata took Michael Rolig’s shark.c -which I use to control my radioSHARK from Linux- made it work with the new radioSHARK 2 and released the new shark2.c (local mirror).
With this development owners of the new radioSHARK 2 can control their shiny new device under Linux to change stations and change its lighting besides other neat tricks like live Internet streaming with icecast2 and darkice as I’ve written before.
I haven’t been able to lay my hands on a radioSHARK 2 but I might do it soon. I hope that griffin has finally managed to solve the annoying bugs in the software that made the original radioSHARK completely unusable under Windows, but keep in mind that Michael and Hisaaki’s work has made the enclosed software completely irrelevant to Linux users, opening a new market for a fine hardware product.

Hello, Planeta Linux!

May 19th, 2007

planetalinux-small.pngAnd now for something completely different: This site is now syndicated in Planeta Linux Mexico.
If you haven’t heard about Planets, they are sites that publish aggregated news feeds around certaint themes in the now all-too-familiar reverse chronologic order. Planets are a great way to feel the pulse and hear the buzz of a community without having to maintain individual subscriptions manually. Throught the years I’ve become reliant in several Planet feeds, most notably Planet Perl, Planet Python and Planet Debian.
A few weeks ago Beco introduced me to Planeta Linux -now I’m an avid reader- and kindly offered to talk to Damog and get this blog’s RSS feed into the site.
If you are one of my three regular readers, go visit Planeta Linux, I’m sure you’ll find it as enjoyable as I do. And if you are a Planeta Linux reader, well… Hello!

  • link
  • link
  • link
  • link
  • link

Comments Off

μHOWTO: Beryl on Debian

April 21st, 2007

Last week Jordi Fernández gave me a quick hands-on tutorial for a working Beryl setup on Debian. He owns a Dell Latitude D620 running Debian GNU/Linux just like mine, so leeching his setup was even easier for me. What sold me immediately into Beryl is that you don’t need to install Xgl.
Basically I edited /etc/X11/xorg.conf and added these lines to the Device section:

Option “RenderAccel” “true”
Option “backingstore” “true”
Option “XAANoOffsetScreenPixmaps” “true”
Option “AddRGBGLXVisuals” “On”

and added a new section to the very end:

Section “Extensions”
Option “Composite” “Enable”
EndSection

My updated xorg.conf is available right here.
After restarting X (ctrl-alt-Backspace for lazy users like me) you can type this on a terminal:

$ beryl-manager &
$ beryl

I have the official nvidia drivers (1.0-8776) installed via module-assistant and a Beryl version that is kind of old (0.2.0+svn20070205-r3687+imudebian0, rather ancient in Internet Time). This worked immediately for me but Your Mileage May Vary.
There you have it. A working beryl setup in a few minutes. Thanks to Jordi for this tutorial and the rather impressive demo that followed, and to the Compiz and Beryl developers for their hard work.

  • link
  • link
  • link
  • link
  • link

Comments Off

μHOWTO: Recover an empty kcontrol tree

April 7th, 2007

empty kcontrolLast night I opened KDE control center to change my desktop settings and I was shocked when I found that kcontrol was empty but for the OBEX Devices panel. Alll the modules that were supposed to be inside kcontrol where inside the KDE “Lost and Found” folder instead. A superficial search in the KDE mailing lists returned a few matches about this problem on KDE4 (did you know that kcontrol is currently unmaintained and that it’s gonna die real soon now?) but I’m currently in KDE 3.5.5 so that doesn’t apply to me.
Tonight Google came to the rescue: after digging a bit more I found this post in the debian forums which mentions that this might be a bug in a debian package and spells out the answer to my problem:

$ sudo ln -s /etc/xdg/menus/applications-merged/kde-essential.menu /etc/xdg/menus/kde-applications-merged/kde-essential.menu

recovered kcontrolVoilá! Now my kcontrol is fully populated again.

Orpie: a RPN calculator

February 13th, 2007

Orpie is a Reverse Polish Notation calculator for the console. If you’ve ever used an HP calculator you’ll feel right at home. if you haven’t… well, go back to your windows box and launch that buggy calculator desk accessory. In my case orpie let me stop worrying about writing “10 k” every time I ran dc(1).
Orpie was written in OCaml by Paul Pelzl and it there’s a Debian package maintained by Uwe Steinmann.
Go ahead and write:

$ sudo aptitude install orpie
$ echo “alias dc=orpie” >> $HOME/.bashrc
$ . $HOME/.bashrc

You won’t regret it.

  • link
  • link
  • link
  • link
  • link

Comments Off

μHOWTO: Enable the SATA CD-ROM Drive in the Dell Latitude D620

September 21st, 2006

After a few weeks using the auxiliary battery instead of the CD-ROM drive, I needed to read a DVD. Surprise! It didn’t work. Reboot. Still no luck.
dmesg didn’t show anything about IDE, and /proc/ide was empty. It was like the CD-ROM didn’t exists at all.
The explanation might be that the CD-ROM is a SATA drive, not PATA. Graham William’s GNU/Linux Desktop Survival Guide holds the key to enable the drive. In short:

# echo “libata atapi_enabled=1″ >> /etc/mkinitrd/modules
# cp /boot/initrd.img-`uname -r` /boot/initrd.img-`uname -r`.bak
# mkinitrd -o /boot/initrd.img-`uname -r`
# reboot

Voilá.
(Part of the ongoing Debian GNU/Linux on Dell D620 saga.

  • link
  • link
  • link
  • link
  • link

Comments Off

μHOWTO: Run VMware Player under Debian GNU/Linux

September 16th, 2006

VMware PlayerVMware has made available VMware Player for free for a few months now. I had been having problems making it run under the latest kernels in Debian GNU/Linux until I found out about the Czech University vmware-any-any patch. Of course, this is unsupported, so YMMV.

A typical installation run would go like this:

$ cd /tmp
$ wget http://download3.vmware.com/software/vmplayer/VMware-player-1.0.2-29634.tar.gz
$ tar -zxvf VMware-player-1.0.2-29634.tar.gz
$ cd vmware-player-distrib
$ sudo ./vmware-install.pl

Answer the questions about installation directories, initscript dirs and such, but *do not configure VMware yet*. I repeat: do not configure VMware yet.

Now we’ll patch the source with vmware-any-any

$ cd /tmp
$ wget http://ftp.cvut.cz/vmware/vmware-any-any-update104.tar.gz
$ tar -zxvf vmware-any-any-update104.tar.gz
$ cd vmware-any-any-update104
$ sudo ./runme.pl

This will patch the vmware-config.pl script, the kernel modules source code and the VMware binary itself if necessary. Now you may run vmware-config.pl when prompted. Please note that for this you must install the linux-tree-2.6.xx package for your current kernel version, and the source must be unpacked under /usr/src/linux. This is supposed to work fine when you have installed just the kernel headers instead, but I always go for the full kernel because -as you may have noticed- I compile a bunch of stuff into my kernel anyway.
After module compilation vmware-config.pl will prompt for network configuration and prompt to enable the Google searchbar (!). The last lines in the configuration should be something like this:

The configuration of VMware Player 1.0.2 build-29634 for Linux for this running
kernel completed successfully.

You can now run VMware Player by invoking the following command:
“/opt/vmware-player-1.0.2-29634/vmplayer”.

Enjoy,

–the VMware team

Now you may head back to VMWare’s site to download a pre-configured appliance to run in your brand-new VMware player installation. Or go to EasyVMX to build your very own virtual machine. In any case, remember to drop a line to thank VMware for releasing this kick-ass product for free!

xorg.conf configuration for nVidia TwinView on the Dell D620

September 8th, 2006

I managed to get TwinView working on the Dell Latitude D620 under Debian GNU/Linux and I’ve been using it for a few weeks now without any problem whatsoever.

The key section in /etc/X11/xorg.conf is this:

Section “Device”
Identifier “Generic Video Card”
Driver “nvidia”
BusID “PCI:1:0:0″
Option “TwinView”
Option “MetaModes” “1280×1024, 1440×900; NULL, 1440×900″
EndSection

Section “Monitor”
Identifier “Generic Monitor”
Option “DPMS”
HorizSync 28-72
VertRefresh 43-60
EndSection

Section “Monitor”
Identifier “External Monitor”
Option “DPMS”
HorizSync 28-72
VertRefresh 43-60
EndSection

I’m using an external 1280×1024 LCD, and I use the KDE control center (Peripherals/Display) to switch between metamodes. The nice thing is that whenever the X server starts and it doesn’t sense the external display it automagically defaults to using only the built-in display. Moreover, TwinView handles gracefully the “hole” below the 1440×900 display. Now what I’d really like to do is to specify that the primary monitor is the built-in display instead of the external LCD, but that can wait a bit longer.

Of course, you can download the complete xorg.conf I’m using, with my finely-tuned (right) TrackPoint and TouchPad configuration.

Hello, Dell!

August 12th, 2006

Dell Latitude D620 As i wrote before, given my (mis)adventures with IBM/Lenovo I decided to change my allegiances and switch to another brand. So during the research phase I took some time to go to the Dell Expo and get to know their laptops firsthand.
One of the questions I had was about the keyboard: after so many years of working with Thinkpads I have become addicted to the TrackPoint, and I was sure that I had seen photos of Dell laptops with such device, so whatever laptop I decided for really had to have it.
I quickly found out that the laptops in the business line -the Latitudes- are the only models to sport such contraption under the Dell-esque name of “Track Stick”. As a matter of fact, besides the Thinkpads they are the only notebooks *anywhere* that still have it, so either they were found unusable by a significant amount of people or IBM tried to milk its patents just a bit too much. Personally, I believe the Trackpoint is the invention of the century right next to the Twiddler (and lately, even _on_ the Twiddler2) but then again some people believe I am somewhat eccentric when it comes to input devices.
So there I was with the entire Latitude line before me to consider. The D420 is very nice and would make a killer travel notebook, but its specs are somewhat conservative for my needs. And the D820 has a nice screen but is way too heavy. So I settled for the D620. I received it last week and I am documenting how to make it work with Debian GNU/Linux.
So here is my hands-on review of the Dell Latitude D620:
Pros:

  • Lightweight: About 4kg with the extra battery.
  • Has a TrackPoint (great for mouse navigation) and a Touchpad (great for erratical mouse movement while typing but useful for scrolling) that fortunately can be switched off.
  • Decent battery life even with a 6-cell.
  • Nice full-sized keyboard with fair displacement, good tactile feedback and a satisfactory click. I could almost forgive Dell for the inclusion of a Windows key instead of a realistically-sized space bar.
  • Mostly supported out-of-the box in Kernel 2.6.16; so far, full support for the devices I’ve tried has involved just a bit of recompilation
  • Nice screen with fair brightness and I haven’t detected any dead pixels so far.
  • Gets kind of hot, but not too much.
  • Real dock connector barring the need to resort to a cheesy USB port replicator
  • Somewhat dull gray-and-black color scheme, but it’s not pre ugly (for a business laptop).
  • Built-in smartcard reader (shows up as an USB device).
  • Built-in fingerprint reader with startup protection right after POST.
  • Did I mention that it has a Trackpoint?
  • Built-in WiFi and Bluetooth.
  • Built-in Wireless broadband with US-centered overpriced carriers (No idea if any of the hardware options would work with some Mexican overpriced carrier, but there is an intriguing SIM slot under the battery anyway).
  • Built-in accelerometer that might be readable under Linux. This might end my MacBook-lightsaber envy.
  • Full Type-II PCMCIA slot instead of ExpressCard, so I can wardrive while I work.
  • Four USB ports.
  • Light sensor for automatic brightness adjustment.
  • Windows Vista capable (*Heh!* Like I care…)
  • Up to 4GB of RAM, if you dare sell your firstborn, your kidney, or your firstborn’s kidney to pay for it.
  • A real parallel and -check this out- DB9 serial port.
  • The inclusion of a TrackPoint is a stroke of genius.

Cons:

  • It really could use a keyboard light (Why do manufacturers still refuse to include them by default? That’d be… what? US$0.05 for a white LED and a switch when bought in bulk? But nooooo…).
  • Both the trackpoint and the touchpad have only two buttons (Unix types may note that there’s one button missing).
  • The 9-cell battery protrudes 1.5in from the front of the laptop instead of going on the back like in IBMs, so it kind of gets in the way and looks very much like an aftertought.
  • Those videos of exploding Dells still give me nightmares.
  • Sorry… no built-in webcam, nor multi-format memory card reader, nor JVC or Bose speakers, nor translucent white lid. This is a business laptop, remember?
  • No Firewire. In this era of Firewire-800 external hard disks that is a serious oversight.
  • The system beep is loud and annoying. Scare-the-cat annoying. Wake-your-neighbours annoying. Get-hit-by-your-wife annoying.
  • No built-in SVideo nor DVI, thought there’s both on the port replicator. Not much of a problem for presentations, but you really need the port replicator to use a decent LCD screen.
  • The Dell USB keyboard is kind of awkward. I keep falling off the left edge, and I have trouble finding the ridges in the F & J keys for touch typing.
  • Sparse to non-existent printed documentation. There’s no manual to ignore. You can get them online if you want them badly. The Service Manual looks interesting, tough.

BTW if anyone from Dell is reading this: please update the configurator for LatinAmerica. You cant’ save your cart. You can’t email it. You can’t even *bookmark* stuff for later perusal. The LA site is primitive, counterintuitive and sometimes even downright annoying. Basically, it got stuck in the 90s.
On the other hand, Dell service was good. Thanks and kudos to both Ivan Castillo -who walked me through Dell’s product line during the Expo- and to Jesus Naranjo -who took my order and was very patient with my obsesive-compulsive hardware demands. One week into it I still haven’t had need to deal with their tech support personnel (Fate has carried on like that for a bit longer) and I hope it stays that way. If they are 50% like their sales people then I have nothing to fear, and altough I have heard some horror stories about them I’m willing to give them the benefit of the doubt for the time being.
In short: Dude, I got a Dell!

  • link
  • link
  • link
  • link
  • link

Comments Off

μHOWTO: Install perl libraries in bulk

August 9th, 2006

When you have to install packages that live out of dpkg, don’t you hate to install their dependencies by hand? I do.
Even though this is exactly what CPAN.pm does, there is a Debian way: If you have another machine with the correct dependencies already installed, you can use dpkg to copy those over.
For instance, this one-liner requests installation of the same Perl libraries that live in another machine:

$ ssh original.machine.com ‘dpkg –get-selections’|grep ‘^lib.*perl’|grep ‘install$’|dpkg –set-selections
$ sudo aptitude -f install

You may replace the first regexp to whatever your want (e.g. “^libapache-mod” for perl modules, “^lib.*java” for Java libraries and so on).
Gotta love Debian.