 A few weeks ago I upgraded my wife’s iPod Touch to 2.1, and I just can’t believe that iTunes won’t let you backup your content even if it means a paid firmware upgrade. I would have used PodsBlitz to back it up, except that Apple decided that it would be a good idea to strip off the disk mode from the iPod Touch.
I decided that there was nothing to be done for the music files: I would have copy the files manually after the upgrade, hoping to replicate my wife’s original selection as closely as possible. But that iPod also has a few of my daugther’s favorite movies… I rightly believed we could have a problem there. I’ve been converting her favorite DVDs for a year, and I carelessly deleted the converted files from the PC a long time ago leaving two options: either invest a few afternoons re-converting those DVDs, or somehow get those files out of the iPod and restore them later.
After a few google searches I stumbled upon a couple of promising projects that some day may grant you unrestricted access to the media residing in your iPod Touch, but those just refused to work in my wife’s PC. A few more queries later I found DigiDNA DiskAid, a nice little utility that speaks the iPod’s obscure file transfer protocol over USB and that lets you copy files back and forth. It’s far from perfect — it wiill only show the physical filename instead of the “real”, tag-based one, and it only does alphabetical sorting, even when sorting by file size. This made hunting for those movie files kind of annoying — annoying but *possible*, which is a lot more that can be said for Apple’s tools.
Category: Hack!
Bourne Shell Server Pages
Easy. Portable. Buzzword-compliant. Ingenuous. Elegant. Right-out wicked cool: Bourne Shell Server Pages. As I write this I’m looking for a excuse to use this revolutionary technology in my next project!
Behold the simplicity of ASP and the power of sh:
<html>
  <body>
    <h1><$ echo "Hello, world!" $></h1>
  </body>
</html>
Interface21: please take note. I expect a Spring.sh implementation before the year ends. ;-)
[tags]bourneShell, asp, jsp[/tags]
Gecko/20070601 C64/Commodore
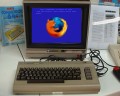 I tought this was just a SpreadFirefox stunt, but I just found the most strange User-Agent in an Apache server log
Mozilla/5.0 (X11; U; Commodore64; en-GB; rv:1.9.0.10) Gecko/20070601 C64/Commodore OS C64
*heh!* I guess it takes another Commodore fan to appreciate this kind of humor.
[tags]Mozilla, Firefox, Commodore, C64[/tags]
09 F9 11 02 9D 74 E3 5B D8 41 56 C5 63 56 88 C0
What’s so special about this number? How is it different from -say- 0x09F911029D74E35BD84156C5635688BF or from 0x09F911029D74E35BD84156C5635688C1? More importantly: can someone copyright a freaking number? Read rudd-o’s Spread this number post and find out why 0x09F911029D74E35BD84156C5635688C0 is so important.
?HOWTO: Convert and display Flash video
 So you want to publish that nice family video in your page/blog/intranet without forcing your visitors to download, install and activate some obscure browser plugin and *then* wait for a 200MB download… Well.. That’s easy as cake!
First, let’s use ffmpeg to convert the video from avi, mpg or mov to something that we can stream to a nice Flash video player:
$ sudo aptitude install ffmpeg
$ ffmpeg -i video.mpg -ar 11025 -s 320x240 video.flv
Then we extract the first frame of the video to use it as a thumbnail:
$ ffmpeg -y -i video.mpg -f image2 -ss 5 -vframes 1 -s 320x240 -an video.jpg
Of course, real men brew their own Flash video players using Ming. The rest of us have to settle for one that has been pre-made, like Jeroen Wijering’s most excellent Flash Video Player. To insert the video in a web page you just have to write
You know, there’s even a neat wordpress plugin that allows a much simpler syntax:
[flv:/path/to/video.flv 320 240]
Cool, eh? Now you are ready to take over YouTube!
[tags]flash, video, flvplayer, ming, ffmpeg, wordpress[/tags]
Add swap space to Linux
This is an old sysadmin trick, but a good one all the same.
Suppose that you finished installing a brand-new Debian GNU/Linux server, and for whatever reason you forgot to set aside some space for a swap partition. Or you correctly got some swap space at installation time but now you desperately need some more. Well, despair not. It’s a little known fact that you can have swap space in a file on top of the filesystem instead of using a dedicated block device.
This simple recipe will give you 2Gb of swap space. Here we go:
# mkdir /var/swap
# chown root.root /var/swap
# chmod 700 /var/swap
# dd if=/dev/zero of=/var/swap/01.swp bs=1024 count=2M
# chown root.root /var/swap/01.swp
# chmod 600 /var/swap
# mkswap /var/swap/01.swp
Now add this newly created swap space to your /etc/fstab:
/var/swap/01.swp none swap sw 0 0
Teoretically, you won’t get the same performance as using a dedicated block device, and if the file actually gets fragmented it might drop rigt to the floor, so if you try this at all do it as soon as possible after installation. So if what you’re trying to do is to *increase* your available swap space instead, you may add a priority option to give preference to the block-device swap space:
/dev/hda1              none    swap    sw,pri=1              0 0
/var/swap/01.swp       none    swap    sw,pri=2              0 0
And just this time activate the swapspace with addswap (The initscripts will do it on every boot thereafter):
# swapon -av
That’s all there is to it. I particularily like how newer BOFH generations look at this with some skepticism at first, and with endless amazement later.
[tags]Debian, GNU, Linux, swap, sysadmin[/tags]
reiserfs and dd_rescue for data recovery
Last thursday the hard disk drive on a development machine died big time. First it started to behave erratically and dmesg showed that it has having trouble with some bad blocks. It did not survive a reboot: ReiserFS woud not mount it on boot, and reiserfsck running from an Accelerated Knoppix CD refused to bring it back to life. At first glance, the disk was beyond repair.
Of course, upon closer inspection, it turned out that the warranty expired exactly two months ago. Normally -after swearing my heart off- I would just replace the disk and make myself a nice paperweight or some other modern art piece -I’ve been looking forward to make one of those nice HDD clocks– but in the guts of that particular HDD were some uncomitted changes that I just wasn’t on the mood of rewriting. Besides, even though most of the data was expendable, the configuration hadn’t been backed up in quite a while (Yes, there is a pattern here).
So here’s the recipe I usually apply in these situations using Kurt Garloff’s dd_rescue. First get a brand-new HDD of approximately the same capacity and place both disks in a working Linux box (Depending on your necessities, booting from Knoppix might do). Let’s call the old, dying HDD /dev/hdg, and the spankin’ new disk will be /dev/hde. For the sake of simplicity, let’s assume that /dev/hdg was partitioned in /dev/hdg1 for swap and /dev/hdg2 for data.
First we’ll copy the entire data partition from /dev/hdg2 to /dev/hde2:
# dd_rescue /dev/hdg2 /dev/hde2
This will take a long, long time. dd_rescue starts with a reasonable block size, but whenever it encounters and error it retries a few times with a smaller block size before skipping the defective blocks and moving along. This is useful because it will copy all data in every readable block, instead of giving up at the first error like dd does. In my case, this took more than a day for a 248GB partition.
Once the data is in a new disk you can try to mount it directly, although it is a good idea to run reiserfsck first to make sure that the files you’ll copy are usable.
# reiserfsck /dev/hde2
Now here you might run into a small obstacle. Ideally I would buy the exact same model as the old drive for recovery purposes, because that guarantees that an exact bit-for-bit copy will work in most cases, partition maps and all. However in this case I bought a different brand, which resulted in a slightly smaller drive and a completely different geometry. When this happens, reiserfsck will complain about the different partition size, and suggests that you rebuild the superblock:
# reiserfsck --rebuild-sb /dev/hde2
Now you can do a normal reiserfsck.
When you’re done just mount the new partition and copy your data to a safe place:
# mount /dev/hde2 /mnt/tmp
# rsync -a --progress /mnt/tmp/etc /backup/dir/
# rsync -a --progress /mnt/tmp/home/arturo /another/backup/dir/
After this you can reformat the new drive for normal usage. Mine is being debbootstrapped as I write this.
This little recipe has saved quite some data and a few disks, including most of mcleod’s late Xbox hard disk. As usual your mileage may vary, but with a litle luck you just might get some of your files back.
Now about that crappy Maxtor HDD… I might just go for the wind chimes instead.
[tags]Linux, sysadmin, reiserfs, dd_rescue, data recovery[/tags]
Some lovely ASCII Art
Andrew Savige’s Bottles of Beer have been found by the Python pundits (and by some gutless Perl defectors ;-) ) and are being waved as a textbook executable-line-noise example. There’s people that can’t stand beauty when they see it.

(That code is now an image -see below- but you can always get the original source code).
Yup, it is a Perl program. Yes, it *does* run, with interesting results. There’s even a CPAN module — Acme::EyeDrops — that turns your own Perl programs into purposely unmaintainable yet beautiful works of art that can make the entire Python Party cringe in disgust. You have to admit that there’s certain merit in making grown men cry. Automatically, no less. Go and read how it’s done.
So the Obfuscated Python Contest is incredibly boring. I couldn’t care less.
Via Carlos de la Guardia/Marc Abramowitz/Chris Petrilli.
Update 20060916: Replaced the code with a graphical version because WordPress 2.0 doesn’t play well with the text hightlight plugin.
[tags]Perl, Python, Obfuscation, ASCII art[/tags]
Griffin radio SHARK + icecast2 on Debian GNU/Linux
 I have been meaning to get a Griffin radioSHARK with the intention of getting it running on Linux. Since it has a nice discount over at amazon I ran out of excuses for not buying one, so I finally ordered it.
Once the sweet sweet parcel arrived the radio SHARK sat for a couple of weeks gathering dust while I got a moment to play with it. Trying to get it to run in Windows XP was totally fruitless. The only way I got it to spit any sound at all was while in audio “test” mode. Not really an option, but at least it meant that that the hardware was working fine.
So now it was time to move it over to Linux. The definitive guide for the radioSHARK under linux is at LinuxQuestions.org. They recommend ecasound to transcode the audio input to the sound card in a single computer, but I rather use icecast2 to stream the signal to different computers around the house — even to the office or while I’m on the road. I don’t care much for the time-shifting feature of the Windows/Mac client, and the record function can be replicated with VLC save to disk function or using command-line tools.
The program that controls the radioSHARK lights and change the current station is shark.c, but if you get it from LinuxQuestions.org you’ll have to copy+paste and clean it up a bit, so you might want to use this ready-to-go shark.c instead.
This is the list of packages for Debian GNU/Linux:
| linux-image-2.6.15-1-k7 | 2.6.15-4 |
| linux-source-2.6.15 | 2.6.15-4 |
| libhid-dev | 20060325-2 |
| libhid0 | 20060325-2 |
| icecast2 | 2.3.1-3 |
| darkice | 0.17-1 |
So how do you get a full-functioning, live-streaming, all-singing radioSHARK working under Debian?
- Plug the radioSHARK in the USB port you’ll get this in dmesg:
usb 1-2: new full speed USB device using uhci_hcd and address 3
usbcore: registered new driver hiddev
input: Griffin Technology, Inc. RadioSHARK as /class/input/input2
input: USB HID v1.00 Device [Griffin Technology, Inc. RadioSHARK] on usb-0000:00:10.0-2
usbcore: registered new driver usbhid
drivers/usb/input/hid-core.c: v2.6:USB HID core driver
- Compile shark.c using
gcc -g -o shark -lhid shark.c - Copy shark to /usr/local/bin
# cp shark /usr/local/bin - Check that your brand-new shark is working:
# /usr/local/bin/shark -blue 60 - Edit /etc/icecast2/icecast.xml and fill out at least the authentication and hostname sections.
- Copy /usr/share/doc/darkice/examples/darkice.cfg to /etc/darkice.cfg and edit to taste. My own configuration goes something like this:
[general]
duration        = 0
bufferSecs      = 5
reconnect       = yes

[input]
device          = /dev/dsp
sampleRate      = 22050
bitsPerSample   = 16
channel         = 2

[icecast2-0]
bitrateMode     = vbr
format          = vorbis
bitrate         = 32
quality         = 0.8
server          = localhost
port            = 8000
password        = icecastPassword
mountPoint      = radio.ogg
name            = Radio MexicoDF
description     = Radio from Mexico, D.F.
url             = http://your.url
genre           = misc
public          = yes
- Start up icecast2 running /etc/init.d/icecast2 start and check out that it’s running by opening http://localhost:8000/ . You should get a status screen without any streams.
- Start up darkice with /usr/bin/darkice -c /etc/darkice.cfg . When you reload http://localhost:8000/ in your web browser you should get a stream mount point with your newly defined stream. Tune in to the stream URL using XMMS, VLC, WinAmp or your favorite audio player, and you sould hear something, at least some white noise.
- To change stations use
# /usr/local/bin/shark -fm 102.5
After a few seconds -depending on your audio player buffer size- you should hear the new station.
My next weekend project will be to create a web front-end to shark — perhaps even implement a record-to-disk option.
TiVo in Mexico HOWTO
Live in Mexico? Have a TiVo? Read the TiVo-in-Mexico HOWTO to transform that glorified VCR into a real Personal Video Recorder.
Update 20051009: I just bought a TiVo 2 unit and it’s on its way, so I’ll update the HOWTO within a few weeks.
Note: This post was originally listed under the static TiVO page, but I’ll start managing the TiVo section with WordPress.